¶ Jupyter Notebook
You can run Jupyter Notebook as a job on the cluster and access it with a local browser that is installed on your computer.
To work with Jupyter Notebook in the cluster do the following:
Download the batch job sample script from here and save it in the cluster.
In the script you downloaded edit the “cd” command with the path of your code:
cd /sci/labs/<pi_login>/<your_login>/your_notebook_folder
Run the script with:
sbatch jupyter_notebook_sbatch.sh
If your jobs starts then wait a few seconds for Jupyter Notebook to start.
Look inside the Slurm output file.
cat jupyter-jobid.out
You will see the tunnel command and at the bottom the URL for Jupyter.
If you are working in Linux or Mac open a new terminal window or tab on your computer.
In Windows with Mobaxterm start a local terminal.
Copy and paste the tunnel command as is in the new terminal window you just opened.
For example:
ssh -J username@bava.cs.huji.ac.il -L 39227:132.65.180.13:39227 username@moriah-gw.cs.huji.ac.il
Enter OTP and IDng passwords.
Then copy the last URL in the out file.
Example URL:
http://127.0.0.1:39227/?token=a66aafeb547c4cc59d7c4b9da24194a3e18fdd51bb9f6fbc
When you finish working with Jupyter Notebook don't forget to press "Quit" button shutdown Jupyter Notebook server.
This will also end the Slurm job.
¶ JupyterLab
Jupyter Lab is also installed in the cluster.
You can run it using the same instructions as for Jupyter Notebook using this batch script.
When you finish working with Jupyter Lab don't forget to select "File" from the menu and then “Shut Down”.
This will shut down the Jupyter Lab server and end the Slurm job.
Jupyter lab offers the following over using the notebook:
- JupyterLab has an improved user interface
- You can open several notebooks
¶ Jupyter Kernels
¶ Install ipykernel
To add a kernel to Jupyter the package ipykernel must be installed in your virtual environment.
Follow these instructions to install it.
Activate the virtual environment that you created:
source /path/to/my/virtual/environment/bin/activate.csh
If you are working in bash shell then source the file activate without csh ending:
source /path/to/my/virtual/environment/bin/activate
After activating the virtual environment run these commands:
pip install ipykernel
¶ Managing Jupyter Kernels
You can use virtual environments that were created with conda or virtualenv in Jupyter Notebook or JupyterLab.
Activate your virtual environment. If the virtual environment was installed by us then use the module load command.
To see which Jupyter kernels are installed run this command:
jupyter kernelspec list
To remove a kernel use this command:
jupyter kernelspec remove <kernel-name>
To install a new kernel run the command bellow:
ipython kernel install --name “jupyter-env” --user
In the sample above we used “jupyter-env” as the name for the environment. Change it to the name you want for your virtual environment.
You can now deactivate the virtual environment.
¶ Using Jupyter The Kernels
Start Jupyter Notebook or JupyterLab as a batch job.
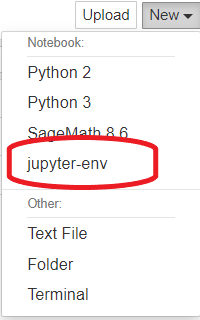
You can select to create a new file with the virtual environment kernel by pressing “New” and selecting it from the list.

When working in Jupyter you can see the kernel you are using at the top right corner.

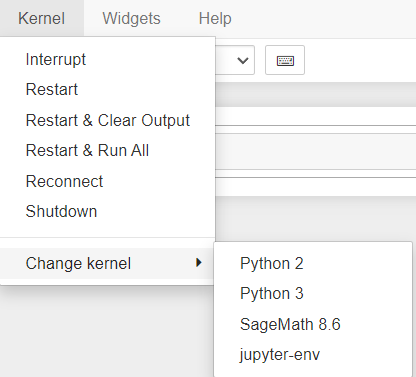
You can also change the kernel of an existing file by selecting “Kernel” in the menu and “Change kernel”.
