¶ Introduction
PyCharm (and indeed, all other JetBrains products) use SSH in order to connect to remote servers for code deployment, debugging and file transfer.
Historically, HUJI cluster nodes had SSH services disabled for security reasons. With the recent adaptation of PyCharm as the native Python IDE on all HUJI workstations, and with rising demand for a solution to remote debugging by HURCS users, the CS System group updated all SLURM nodes at HUJI to support SSH, with the caveat that only users having a currently running job on a certain compute node can access it.
This, along with the fact that there are ~40 compute nodes on the HURCS cluster makes connecting to the correct machine a bit complicated.
The following sections will describe the various steps required to enable remote debugging with PyCharm, as well as some tips on how to make things easier for subsequent connections.
¶ Testing the Infrastructure
Before we start with PyCharm, lets run a quick test to ensure that your computer is able to communicate correctly with the compute nodes.
If you are unfamiliar with SLURM commands and argumentssa, see our SLURM guide first.
¶ Step 1- Allocating Resources
As stated above, before you can connect to a compute node, it needs to have allocated resources for your user on it.
The simplest way to do so would be to use the salloc command. This command accepts most of the same arguments as sbatch and srun do, and so if you were already running your program on the cluster, you can simply copy your parameters from your original scripts.
Just like srun and sbatch, the salloc command will wait until the requested resources are available, printing out the job-id for the newly created SLURM job as well as the node(s) on which the resources were allocated.
However, unlike those previous commands, salloc does not accept a program name or path, and won't execute any code on the cluster nodes! It will simply allocate the requested resources, allowing you to utilize them at some other time.
Note!
You may ask yourself, why usesallocoversrun?
The short answer is - convention!
srunallocates resources for a named program provided as a command line argument, whilesalloconly allocates resources without “connecting” them to a specific program.You also don't want to close a terminal session only to discover that it has terminated your SLURM job, disconnecting PyCharm!
¶ Example: Allocating resources
For the purpose of this test, we can settle for all the default values and simply call salloc without any arguments:
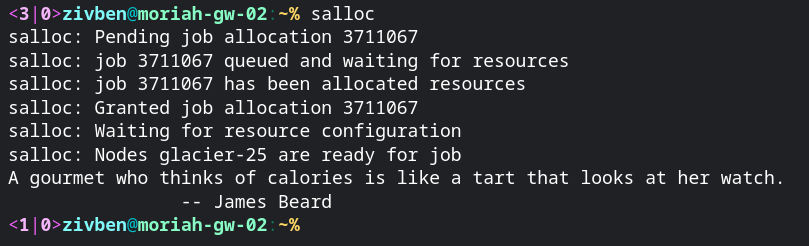
salloc will print out the allocated node(s) and reload the terminal Notice the random “fortune cookie” printed out?
Make sure not to exit this terminal, as this will revoke the job allocation!
¶ Step 2 - Testing the Connection
Follow the instructions on our ‘How to login’ page, only this time use the node name you got from the salloc command instead of ‘moriah-gw’.
In the screenshot above, I was allocated resources on the node glacier-25. This means that the address of the server I will try to connect to is glacier-25.cs.huji.ac.il. All node addresses follow the form <node-name>.cs.huji.ac.il.
Since I'm lucky enough to be using a linux system, connecting to a remote server will be easy:
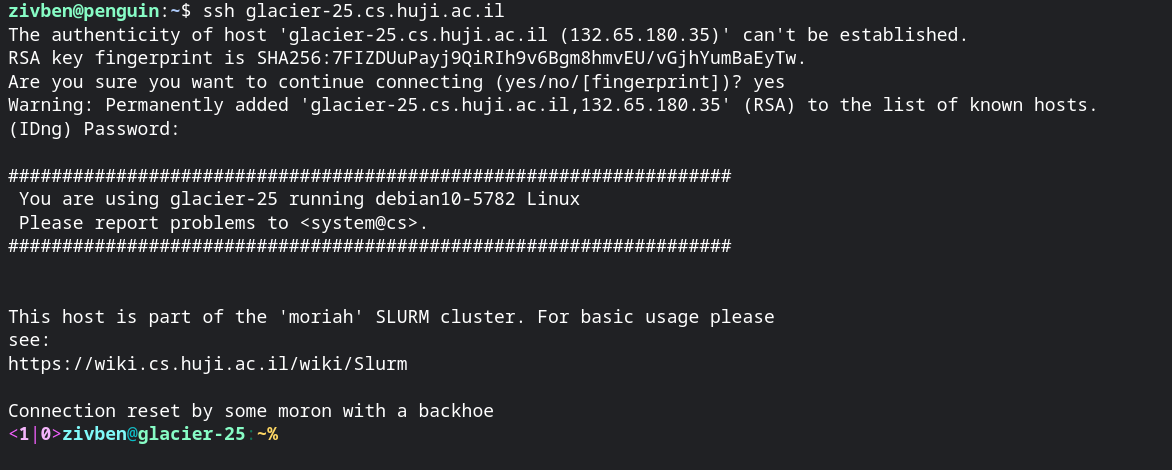
Simply typing ssh glacier-25.cs.huji.ac.il and typing my password will connect my terminal to the compute node!
If, for whatever reason, you can't manage to open a terminal on a compute node, debugging will certainly not work. Contact us at support.hurcs@mail.huji.ac.il
¶ Setting Up PyCharm
The instructions here may differ slightly with different versions of PyCharm, and may not be fully supported by the community edition of PyCharm.
Don't worry though, as all users with a HUJI email address can register for a free student account with JetBrains, allowing you to use the professional editions of all their tools.
¶ Step 1 - Create or Open an existing project
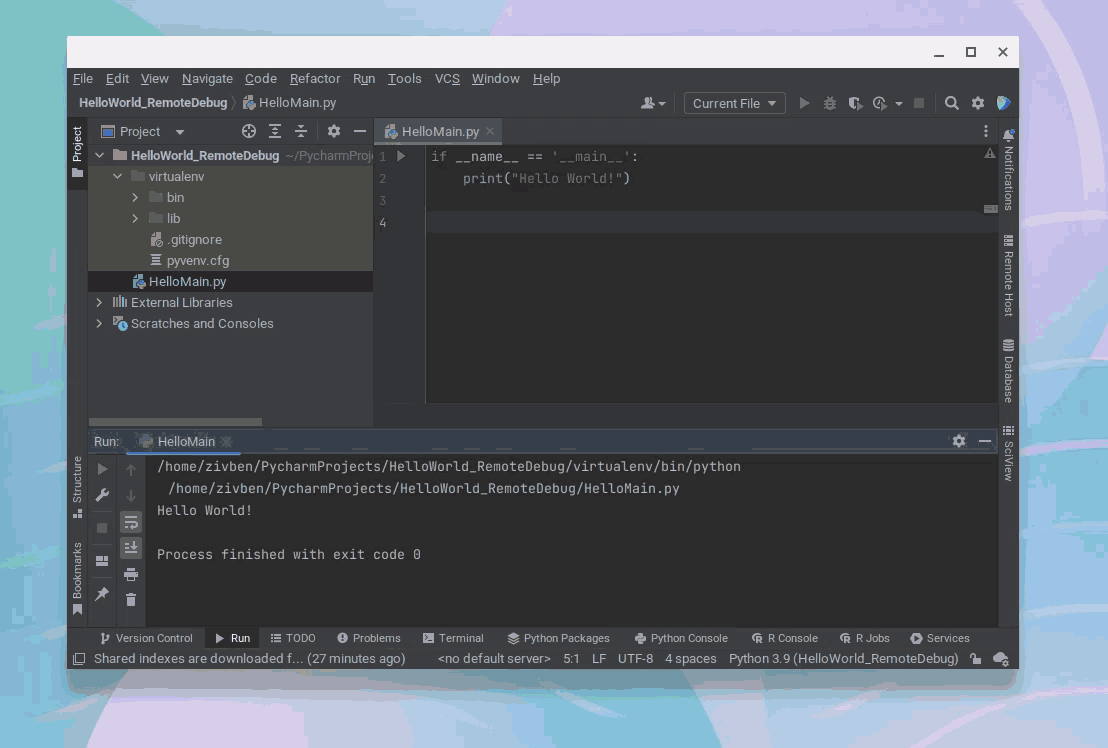
Lets start by creating a simple “Hello World” project with PyCharm:
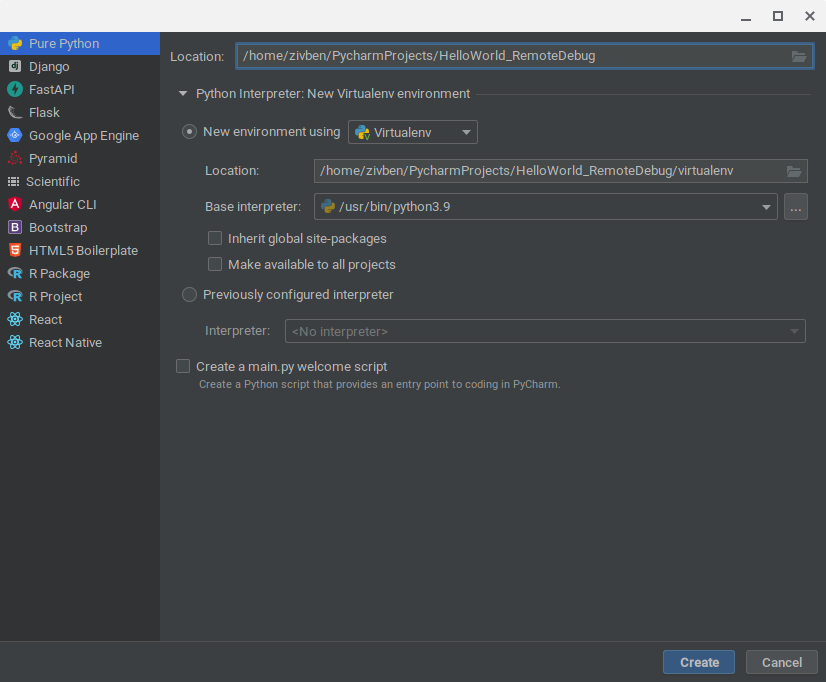
Note that your personal computer may have a newer version of python than installed on the cluster. I'm using python 3.9 here, but version 3.7 is the one available remotely. make sure not to write code that cannot be executed by the available version, or install your own interpreter for personal use.
I wrote a tiny script and made sure it runs on my laptop. Yay!

¶ Step 2 - Configure an SSH connection
When setting up the remote interpreter, we will need to set up the remote connection as well. Follow these steps:
- in your PyCharm main screen, click the interpreter selection panel at the bottom right.
- choose add new interpreter
- then choose ssh interpreter
- Once you are in the “Connecting to an SSH server” screen, you can choose between new or existing connections
- If you have already set up a connection to a specific node, you can choose it there
- If you want to connect to a new node/server - choose new
- In the “New connection” screen you will need to fill in the full hostname as well as your username
- You will then be prompted for your password (more than once if running a newer version of PyCharm) while PyCharm tests the SSH connection
Remember! you MUST have allocated resources on the cluster node you are attempting to connect to!
This is only half of the process! Have a look at the GIF below for a visual tour of all the steps, the rest of which will follow below.
¶ Step 4 - Choose an Interpreter
Once your connection has been verified by PyCharm, you will be asked to choose the interpreter you will be using.
While you can use the system interpreter, along with all of the preinstalled packages on the cluster, it's best to have a virtual environment on the cluster that is identical to the one you are using on your personal computer. Choosing a virtual environment interpreter as the remote one is done the same way as below, just point PyCharm to the python3 executable in your virtualenv.
For this guide we will focus on setting up the system interpreter:
- First, in the setup screen titled “Project directory and Python runtime configuration” choose “system interpreter” on the left hand panel.
- You will then see two fields: interpreter and sync folders
- In the “interpreter” field, you can choose whichever python executable you want. A safe bet will be
/usr/bin/python3which is the default interpreter on all HURCS machines. - If all your input files reside under the base project directory, you can leave the “sync folders” field in its default value. Otherwise, read below-
- Sync folders are the folders that are copied between the local and remote machines when running code using a remote interpreter.
- By default, the project root is copied to a randomly named folder under
/tmp, which is the temporary mount of the remote node. - If your code does access other paths that are not under the project root, you can map those paths using the ‘folder’ button next to field.
- Ensure your code is agnostic of where it's running!
If you code tries to access a file at/usr/home/projects/data/, while the script is at/usr/home/PyCharmProjects/secret, you'll need to sync and map the data folder in a way that both local and remote executions could find it. For example:- In your code, use relative paths. Since your home folder (/usr/home) can be accessed using the tilde (~) sign, you can save the data folder path as
~/projects/data - In your remote interpreter setup, map that folder into your personal home folder on the cluster. Make sure to create the parent folders if necessary!
- In your code, use relative paths. Since your home folder (/usr/home) can be accessed using the tilde (~) sign, you can save the data folder path as
- Finish by clicking “Create”
- In the “interpreter” field, you can choose whichever python executable you want. A safe bet will be
Your project is now configured to run using a remote interpreter!
¶ Working with Your Own Code
In the sections before, we made sure we are able to allocate resources, create a simple project and run it using a remote interpreter running on a cluster node.
In real world scenarios we'd usually like to run code that we've already been using locally, but with more resources. We also don't want to go through the entire setup process each time we get a new node on the cluster!
While there is no simple way to automatically configure all nodes and have them automatically selected for us, we can take some steps to speed things up.
¶ Resource allocation
While we usually think of resources as memory and CPUs, we can also request a specific node(s) in our salloc call.
Since I previously set up node 25, I can try and request that specific node every time. To do that, we'll use the --nodelist or -w arguments:
zivben@moriah-gw-02:~% salloc -c16 --mem=64G -w glacier-25With the above command, I've requested 16 CPUs and 64GB of RAM to be allocated on the node glacier-25.
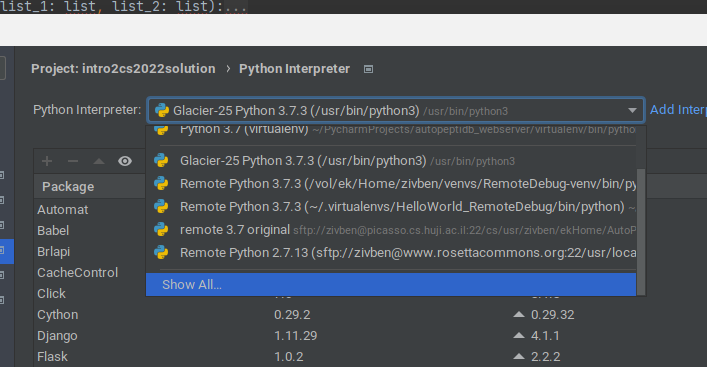
¶ Interpreter selection
The interpreter selection panel on the bottom right of PyCharm's editor screen will show you recent interpreters used. It helps, then, to give them meaningful names!
The same interpreter we created in the testing phase above (called “Remote Python 3.7.3 (/usr/bin/python3)”, since we didn't change its name) should appear there even when you open other projects!

To change the name of the interpreter, click the “Interpreter Settings” button at the bottom of the interpreter selection pop-up.
In the following screen, click the drop-down menu and then hit “show all”
Finally, select the relevant interpreter from the list and click the edit button (shaped like a pencil) to add the node name.
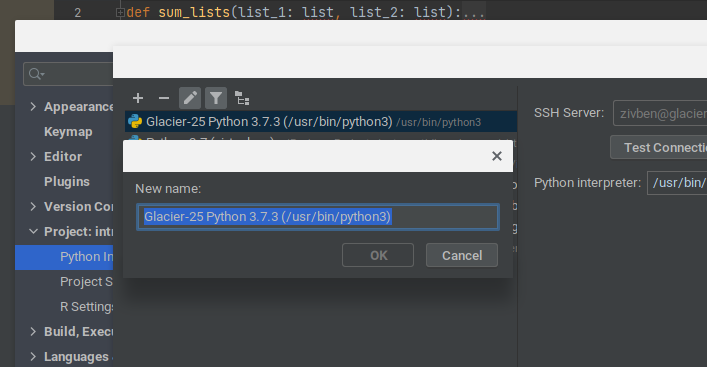
Now, whenever we have a resources allocated on node 25, we can select this interpreter.
If there are not enough resources available on our node of choice, we can simply omit the -w flag and let SLURM pick a node for us. Repeat the interpreter selection steps (remember to add the new node number to its name!).
Next time you need to debug, you'll have two nodes to choose from. And if they are both busy, you can always set up a third interpreter, and a fourth… and so on.